How to Use the Exposure Triangle for Stunning Wildlife Photos

Blog and photos by Kyle Moon
As a photo guide and instructor with Yellowstone Wild, I am often asked, “What setting should I be at?” The truth is, it simply depends on what you’re trying to accomplish. Let’s not forget that photography is a form of art, and you can manipulate your camera settings to achieve a desired outcome, each rendering different results. Are you trying to “expose to the right (ETTR)”? Are you working with dappled light and want just your subject lit? Are you trying to capture an intentional camera movement (ICM) shot? Or are you simply aiming to capture the scene in front of you as you see it? In this article, we’ll focus on the latter: the basics of understanding the Exposure Triangle and what that means for adjusting your camera settings.

The Exposure Triangle
To properly expose a photograph, you need a basic understanding of the Exposure Triangle and how each side affects the others when you adjust your settings. I’ll explain each side in detail and share my “secret formula” for wildlife photography.
Shutter Speed
Shutter speed is how long your camera’s shutter remains open, controlling how much light reaches the sensor. For wildlife, this is the most critical setting because you need enough speed to freeze motion. Without it, your photo will blur, and no amount of editing can fix that.
Aperture
Aperture is an adjustable opening within the lens that controls the amount of light entering the camera. I consider this the second most important function, as it determines depth of field. Aperture is displayed in f-stops, where the number is inversely proportional to the opening. A smaller f-stop number (f/2.8) means a larger opening that lets in more light, while a larger number (f/22) means a smaller opening, blocking more light.
If you have multiple subjects, you’ll likely want a smaller aperture (larger f-stop number) to ensure everything is in focus. However, most of the time I’m focusing on a single subject, so I keep my aperture as wide open as possible—the smallest f-stop number my lens allows. This prioritizes light hitting the sensor, giving the camera more flexibility and efficiency. The more light you have, the more options you can work with!
ISO
ISO determines the image sensor’s sensitivity to light. In other words, it brightens or darkens your photo but can also introduce digital noise, or graininess. ISO is displayed as a number: the higher the number, the brighter the photo, but also the noisier.
I find ISO to be the least important of the three functions because it “is what it is.” Today, post-processing software does a great job of reducing noise. The main goal is to keep ISO as low as possible—but not at the expense of shutter speed or aperture.
Putting It All Together
Now that we understand the Exposure Triangle, let’s put it into practice with my go-to approach for wildlife photography.
I start with aperture. Since I usually photograph single subjects—or multiple subjects on the same plane—I shoot “wide open.” This means using the largest aperture (smallest f-stop) my lens allows. With more light hitting the sensor, I can increase shutter speed for sharper photos or reduce ISO to minimize noise. Ever wonder why some lenses are so expensive? It’s because of their large maximum apertures. That’s what you’re paying for—so use it.
Next comes shutter speed. This setting can be tricky for beginners because it requires practice and judgment. You need to gauge what shutter speed is necessary for sharp photos in a given situation. Remember: no sharp photo means you have nothing—so be generous with shutter speed when possible.
Lastly, ISO. The goal is to keep ISO low without sacrificing shutter speed to do so. Blurry photos aren’t worth keeping, no matter how low the ISO. Think about it: how many blurry shots do you actually keep?
The most important takeaway is understanding the relationship between shutter speed, aperture, and ISO, and how they affect one another. Wildlife photography is full of variables—changing light, static versus moving subjects, depth of field, and more. The best way to master these relationships is simply to get out and shoot. Experiment with these settings, and you’ll see for yourself.
Below are three examples outlining my thinking with various subjects and in different lighting conditions:
Example 1: ISO 5000, f/5.6, 1/3200s
Smaller birds, such as this mountain chickadee, move incredibly fast. To freeze the action, I needed a high shutter speed—in this case, 1/3200 of a second. Notice how the back of the wing still shows some motion blur. If I had used 1/4000 of a second, I might have frozen the action completely, but I would have needed to either raise my ISO or decrease my aperture to maintain proper exposure.
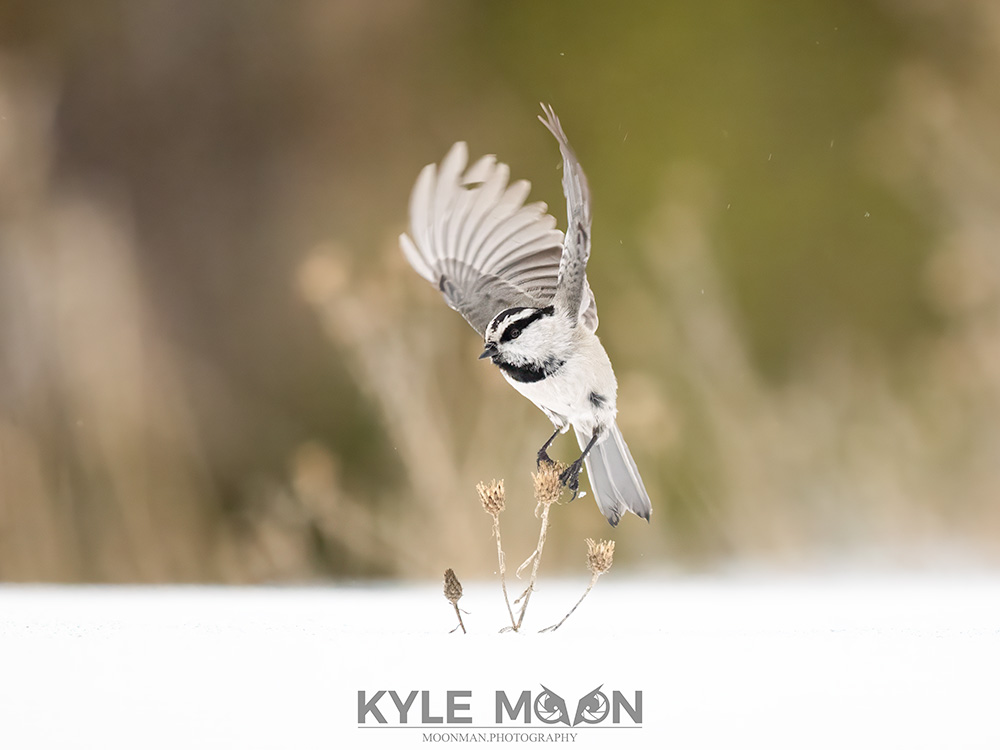
ISO 5000, F5.6, SS 1/3200. Kyle Moon
Example 2: ISO 2500, f/4.5, 1/400s
For a static subject like this red tree squirrel perched on a branch, I could significantly reduce my shutter speed to lower my ISO. This particular day was overcast, and we were under a forest canopy with limited light. I probably could have lowered my shutter speed even further to reduce ISO, but I’m comfortable shooting at higher ISO values. The key is knowing your camera’s limit for high ISO performance and the lowest shutter speed you can handhold without blur.
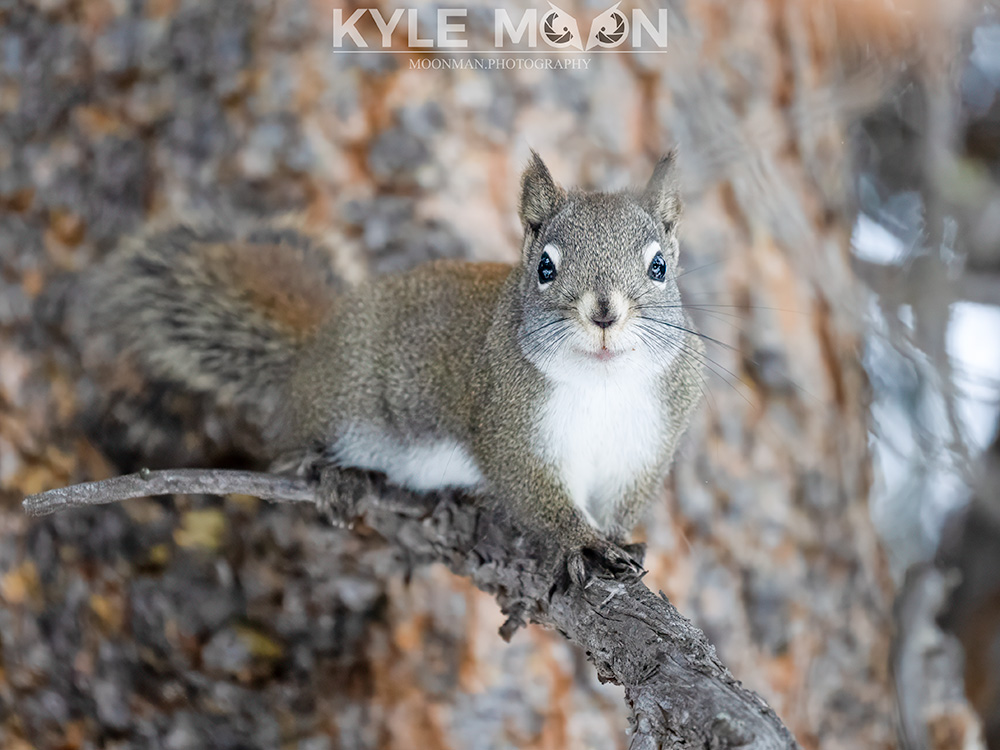
ISO 2500, F4.5, SS 1/400. Kyle Moon
Example 3: ISO 800, F4.5, SS 1/5000
Sometimes you’ll have more light than you know what to do with, as in the scene shown here. In these situations, I like to generously splurge on shutter speed. Sure, I could have lowered my ISO and avoided using such a high shutter speed, but then I wouldn’t have been able to freeze the snow as the wind kicked up and blew it off the cliff. The extra shutter speed also helps ensure a sharper image if you struggle with handholding your camera.
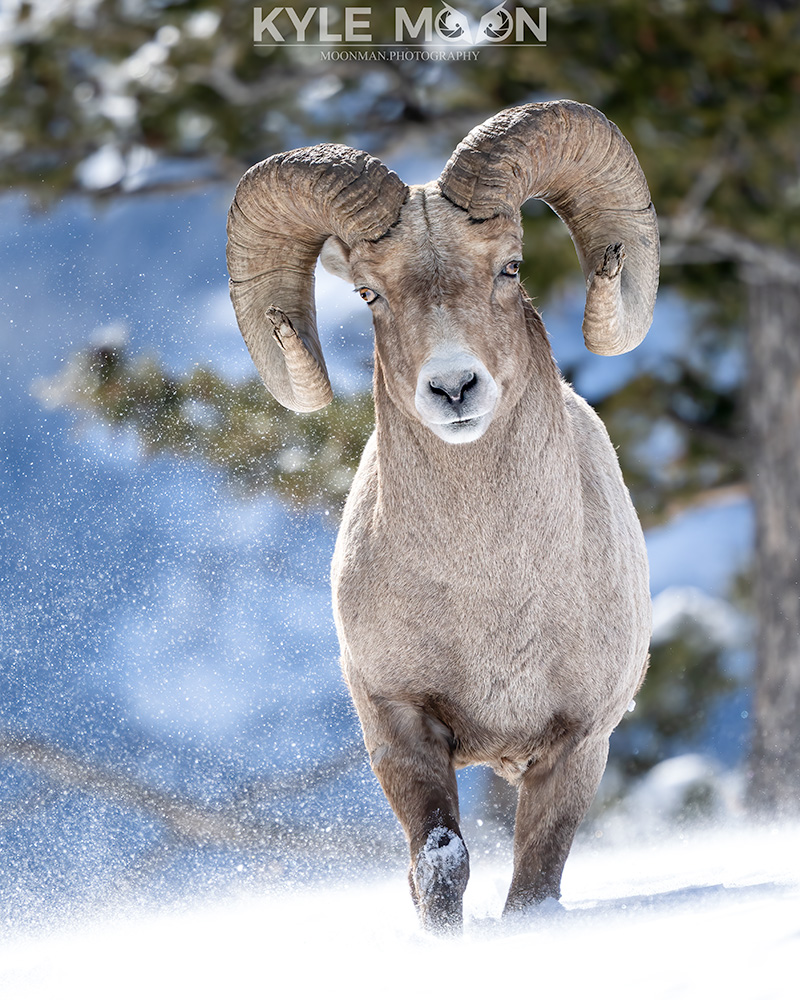
ISO 800, F4.5, SS 1/5000. Kyle Moon
Mastering exposure settings in wildlife photography isn’t about memorizing one perfect formula—it’s about understanding the relationship between shutter speed, aperture, and ISO, and knowing how to adjust them based on light, subject, and movement. With practice, these decisions become second nature, and your photography will grow sharper, cleaner, and more creative.
The best way to accelerate that learning is to get out in the field, experiment, and see how different settings change your results. And if you’d like guidance while photographing incredible wildlife in one of the most dynamic landscapes on earth, consider joining me, Kyle, on a summer or winter photo tour with Yellowstone Wild. It’s a chance to deepen your skills, explore new techniques, and capture unforgettable moments in Yellowstone’s wild beauty. And don’t forget to visit my website, Moon Man Photography, to check out more images!

To learn more about Kyle, and the rest of the Yellowstone Wild team, visit our “About Us” page.